Menu
Next
Clip Editor
The Clip Editor is one of the most important parts of LipSync Pro. This is where you will do most of your work in creating your dialogue animations.
It has a number of features for adding and editing phonemes, emotions and gestures - both manually and automatically.
In This Section
Overview
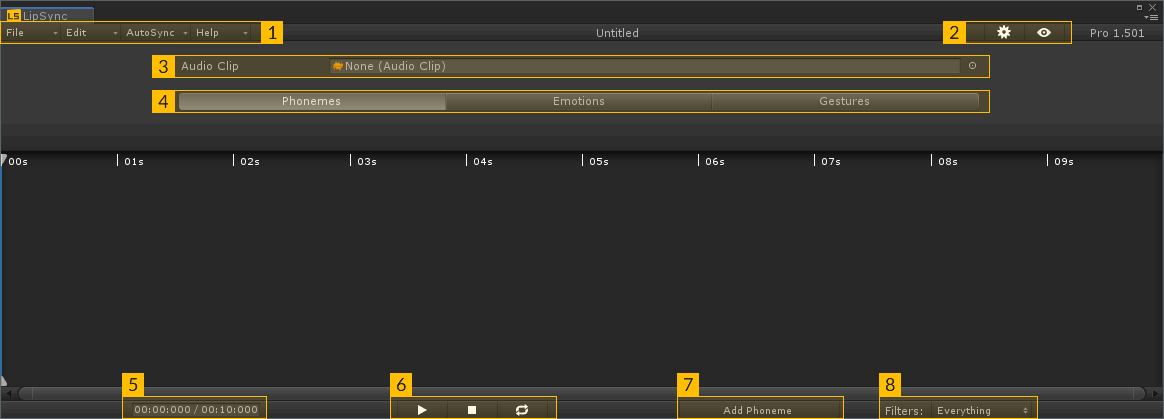
The main part of the Clip Editor shows the waveform when an AudioClip is chosen, above this is a timeline where markers will appear.
The annotated areas are as follows:
-
Top Menu
Similar to a standard Windows application, the File menu contains project and I/O options. See Top Menu Contents below.
-
Settings & Preview Buttons
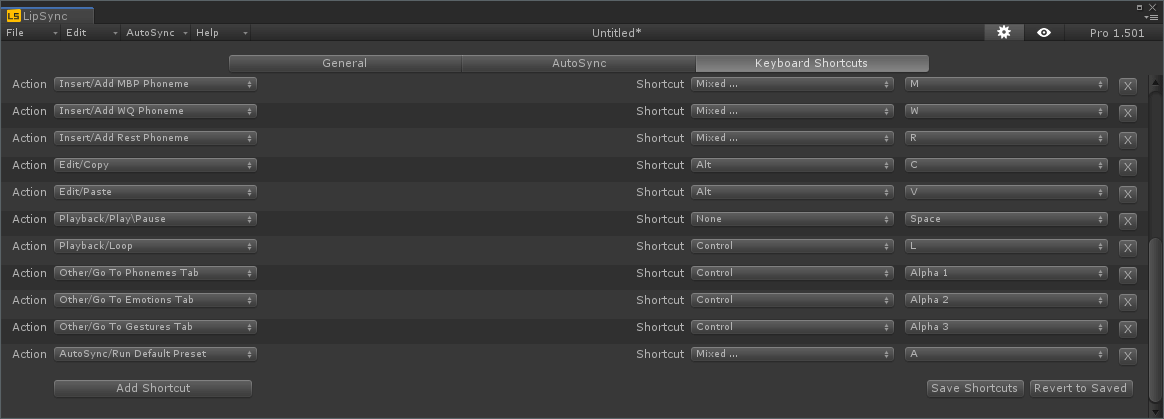
The Settings button will toggle the settings screen of the clip editor on and off. This is where preferences for how the Clip Editor functions can be set, and AutoSync
modules can be configured. Hovering the mouse over any option will show a tooltip explaining it. This is also the home of the Keyboard Shortcuts screen, where you can configure
any number of keyboard shortcuts for various Clip Editor tasks.
The Preview button allows you to select any character in the currently open scene to use to preview the animation you're working on.
Clicking this button will show a drop-down list of all characters (LipSync components) in the scene, and selecting one will enable preview mode. Clicking the button again and
selecting the "None" option will turn preview mode off.
-
AudioClip Selection
This is a standard Unity object picker you can use to select any AudioClip in your project as the basis for this LipSyncData clip.
Note: Clips can be created without an AudioClip, and still be played back. This can be useful for queuing small gestures or emotions as part of a conversation.
Note: The duration of a LipSyncData clip always matches the duration of the linked AudioClip when one is present. This means that changing the clip once markers
have been placed will not adjust their times relative to the new clip. E.G. A marker that started halfway through a 5 second clip - at 2.5s - will still start halfway through
if the clip is changed to a 10 second one - so will now start at 5s.
-
Marker Mode Tabs
Allows switching between the 3 types of marker LipSync Pro supports - Phonemes, Emotions & Gestures. Changing modes will change what type of marker is shown on the timeline,
along with some elements of the editor UI. See Marker Modes below for more info.
-
Timestamp Display
Displays the current playback time and the total duration of the clip. Clicking this will also open the Clip Settings window.
-
Playback Controls
Controls playback of the current clip. The buttons are:
- Play / Pause - Toggles playback of the clip.
- Stop - Stops playback and moves the playhead back to the start of the clip.
- Loop - Toggles looping of the clip. If on, playback will continue from the start after finishing.
-
Add Marker Button
Depending on the current marker mode, this may be labelled "Add Phoneme", "Add Emotion" or "Add Gesture". Clicking it will bring up a list of
available markers. Selecting one will add it at the current playback time.
-
Phoneme Filters
Only visible when in the phoneme marker mode, this control lets you filter the visible markers according to the phoneme they represent. This is useful for clips with many
markers, so you can more easily see only the markers you're interested in.
Top Menu Contents
- New File - Resets the clip editor, clearing any data.
- Open File - Opens a file browser to load an existing .Asset LipSyncData file from your project to edit.
- Import XML - Opens a file browser to import a previously-exported .xml representation of a LipSyncData file to edit.
- Save / Save As - Saves any work on the current clip to a .asset LipSyncData file.
- Export - Exports a .UnityPackage containing the LipSyncData file and a copy of the AudioClip, ready for importing into a different project.
- Export as XML Exports the data in the text-based .xml format.
- Project Settings Selects the Project Settings file in the inspector.
- Exit - Closes the Clip Editor.
The
Edit menu contains functions relating to editing data:
- Copy / Paste - Copies or Pastes the current selection of markers on the timeline.
- Select All - Selects all un-filtered markers on the timeline.
- Select None - Deselects all un-filtered markers on the timeline.
- Invert Selection - Inverts the selection, so unselected markers are now selected and vice versa.
- Set Intensity From Volume - Opens Set Intensity from Volume window.
- Reset Intensities - Sets all marker intensity values back to their default.
- Default Marker Settings - Opens the Default Marker Settings window.
- Clip Settings - Opens the Clip Settings window. Also accessible by clicking the timestamp display at the bottom of the Clip Editor
Pro The
AutoSync menu contains functions relating to
AutoSync - LipSync Pro's automation system:
Finally, the
Help menu contains links to help resources.
Marker Modes Pro
There are three different types of marker in LipSync Pro - Phonemes, Emotions & Gestures.
- Phonemes are the basic building blocks of speech animation. These mark the mouth shapes that create lipsyncing animation.
- Emotions are larger poses involving the entire face, used to add more expression and nuance to the animation.
- Gestures are potentially full-body animations (using Unity's Animator system) that can be cued to synchronise with the lipsync.
The Clip Editor UI changes depending on which mode is selected. In phoneme marker mode, phoneme markers are visible along the timeline. They can be added via the "Add Phoneme" button
or through the right-click menu.

Phoneme markers can also be dragged along the timeline to re-arrange them, and deleted or changed by right-clicking on one. You can also select and multi-select markers, either
by clicking on an empty part of the timeline and dragging a box around the markers you want to select, or by clicking individual markers - holding control to add/remove from
the selection or shift to add/remove the range between the two clicks.
From the right-click menu, you can also change the marker's settings - each marker has an intensity value that changes its influence on the animation,
along with options for randomness to create variety between otherwise identical markers.
Emotion markers can be added the same way, though they work slightly differently. Instead of a single handle, they have start and end handles which can be dragged separately,
and a bar connecting the two. Dragging either start or end handle will resize the marker, and dragging the bar will move the entire marker around.
Additionally, there is a blend-in and blend-out ramp on either side of the bar - these show the duration of the blends in and out of the marker. By moving the mouse over the
edge of a ramp, a drag handle will appear, which can be used to change this duration.

Two emotion markers can also be blended directly into one another, by dragging one partially inside another. You will notice the corresponding ramp now goes into the other marker,
and the duration of the blend is set by the overlap between the two markers.
Finally, Gesture markers work exactly like phoneme markers, though they lack modifiers like intensity and randomness, and as there is usually a much smaller number of them,
they cannot be filtered like phonemes.
Emotion Mixer Pro
Instead of chosing a single emotion from the list, an emotion marker can be set as an "Emotion Mixer". These markers function identically to normal emotion markers, however
their right-click menu also contains an "Edit Emotion Mixer" option, which allows you to select any number of emotions in your project and mix them together by percentage.
You can use this to create unique mixes of poses for different situations.
There are two mixing modes for Emotion Mixers:
-
Normal - in this mode, the percentages of all the chosen emotions will total 100%. As you increase the influence of one emotion, all others will decrease accordingly.
This creates a final pose that is never more exaggerated than any of its component poses.
-
Additive - in this mode, each emotion's percentage can be anywhere from 0% to 100%. Two emotions, both with 100% blending will be layered additively, potentially
causing a final pose that is far exaggerated beyond either pose.
Menu
Next